Paying with cryptocurrency
Screen: Top up balance, address /finances/topup, the card method, the cryptocurrency row.
Cryptocurrency sits in the same list as the card gateways. Choose Credit card, press Top up balance, and in the Balance top-up panel find the row with the cryptocurrency logo and the BTC, ETH and USDT icons. Expand the row to see Minimum amount and Maximum amount; PAY starts the payment.
Two different payments behind one row
What opens after PAY depends on how cryptocurrency is set up for your account, and you do not choose it.
- A gateway checkout. A Top up with cryptocurrency window opens with the payment gateway's page inside it. You choose the coin and pay there.
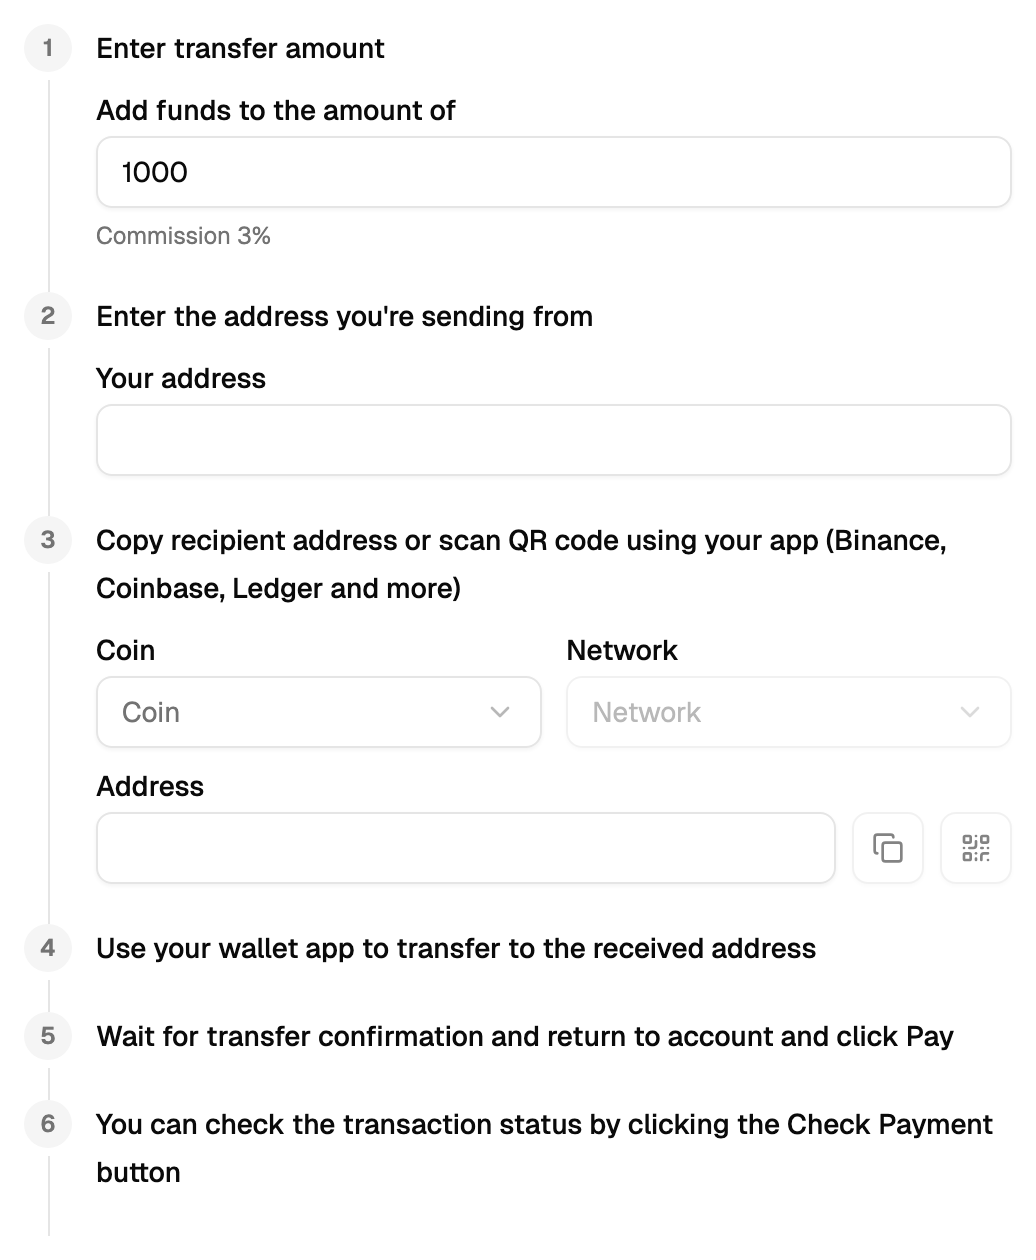
- A transfer to a wallet. A Top up with cryptocurrency panel opens with six steps. You send the coins yourself, from your own wallet app, and then tell the cabinet about the transfer.
Limits, prices and the set of available options are tuned to your account. This documentation gives the meaning rather than the figure: the current value is always shown on the screen, next to the field it applies to.
Paying on the gateway page
When the row expands, the gateway variant shows Fee … and the line Fixed network fee (Blockchain fee): the gateway takes its fee, and the blockchain takes its own on top.
Follow the gateway page to the end. Closing the window takes you back to the top-up screen and refreshes the balance shown there; it sends nothing to the gateway and does not cancel a payment that has already gone out.
Every PAY starts a new attempt with a new gateway page. The page from a closed window is not kept, so if you stopped halfway, start again with PAY rather than going back to an old page.
Transferring to a wallet yourself
| № | Step in the panel | What to do |
|---|---|---|
| 1 | Enter transfer amount | The Add funds to the amount of field is filled in from the top-up screen; change it if you are sending a different sum. The commission is written under the field. |
| 2 | Enter the address you're sending from | Your address is the address of the wallet the coins will leave. |
| 3 | Copy recipient address or scan QR code using your app (Binance, Coinbase, Ledger and more) | Pick Coin, then Network. Address fills in, with a Copy button and a QR button next to it. |
| 4 | Use your wallet app to transfer to the received address | Send exactly the chosen coin over exactly the chosen network. |
| 5 | Wait for transfer confirmation and return to account and click Pay | When your wallet shows the transfer confirmed, press the panel's button. It is labelled Deposit, not "Pay". |
| 6 | You can check the transaction status by clicking the Check Payment button | The panel has no such button. Follow the payment in the financial report instead. |
Take the recipient address, or scan its QR code, only from the panel you opened for this payment in your own cabinet. Never take it from an earlier payment, a screenshot, an email or a chat message, including one that seems to come from Blackbox Business: this documentation never prints it. Each coin and network pair has its own address, so change the coin or the network and the address changes too.
The commission on a transfer
The balance receives the transferred sum minus the commission written under the amount field. The Deposit button shows the figure after the commission next to the coin, so check it before you press.
When you press Deposit
All four fields are required: amount, your address, coin and network. With one empty the panel highlights it and sends nothing.
If the panel shows Transaction not found, it stays open with everything you entered. The most common cause is pressing too early: wait until the transfer is confirmed and press again. The same text appears on any refusal, so if the transfer is confirmed and the message stays, check the coin, the network and your address, then write to support with the transaction hash from your wallet.
When the transfer is accepted, the panel closes and two messages appear: Thank you. Your balance will be topped up after confirmation of payment by payment system and Payment completed successfully. Both are about the request, not about money on the balance.
The panel starts empty every time it opens. Closing it before Deposit loses what you typed, but not the transfer itself: open it again, enter the same amount, address, coin and network, and press Deposit.
The border with the balance
The same rule as everywhere on this screen: a payment accepted by the gateway or the panel and money on your balance in Blackbox Business are two different events. The financial report is the place that answers the second question.